How to Paint Horizontal
Wall Stripes
Horizontal wall stripes can visually push the walls out and expand the space.
So if you want to make your room seem wider (or just like the look), follow the DIY painting instructions below to measure, mark and paint the stripes like a pro.
This painting project may seem intimidating, but if you focus on just one step at a time and on doing each step properly (without rushing it), you will avoid overwhelm and produce the results you'll be proud of.
Besides, since they are pretty wide, painting horizontal wall stripes is usually a much faster process than vertical wall striping, so let's get started.
Tools and Materials for
Painting Horizontal Stripes
Here's what you'll need for painting horizontal stripes in a 2-color combination:
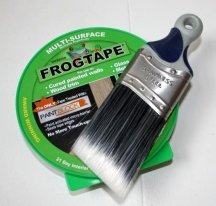
- a tape measure or a long ruler
- a long carpenter's level tool
- a pencil and/or a piece of chalk
- 1-2 rolls of multi-purpose green Frog tape
- a mini-roller (for the stripes)
- a regular sized paint roller (for the base coat)
- a roller paint tray with 2 liners
- a paint brush (for cutting in)
- latex paint in 2 colors of your choice
- a step ladder
Instructions for Painting
Horizontal Wall Stripes:

1) Protect and cover the surfaces you are not painting (the floors, furniture, etc).
Also carefully mask the baseboards, ceiling, door and window trim for sharp paint lines.
2) Cut in and roll on the base color paint and let it dry for a day (the finish needs this time to cure before you start taping off the stripes).

3) Measure the wall height in inches (don't include the baseboards or crown moldings).
4) Decide how wide your paint stripes will be (usually you'll want them at least 12" wide) and divide that number into the wall height.
Tweak the stripe width if necessary, to get an
even number (if you want equally sized stripes top to bottom).

5) Mark the widths of your stripes.
Start in the top corner and work your way down, ticking the wall.
For example, if you'll have 7 stripes on the walls, you'll need to make 6 pencil ticks in one vertical corner.
This will be your starting
point.
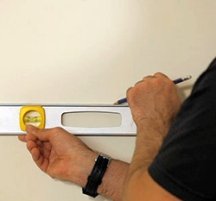
6) Draw guidelines lightly with a piece of chalk.
Begin from the pencil marks in the starting corner and move across the entire wall horizontally, using your carpenter's level tool.
Keep moving right
and across the adjoining walls, until you connect the lines with the
original marks in that first corner.
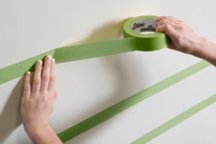
7) Tape the outside edges of each band that will be painted in the stripe color.
Burnish the tape's working edge with a plastic spoon or your fingernail to seal it tightly to the wall and prevent paint seepage.
Stick
small pieces of tape to the areas that you should skip, so you won't get confused when you start painting.
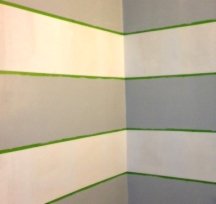
8) Roll on the stripe color paint in the alternate bands (use a mini roller and the second paint tray liner for this color).
Once it's dry to the touch,
apply a second coat if needed for better coverage.
9) Remove the tape carefully as soon as you are finished painting.
Clean up or touch up the wall stripes, edges and corners if you see any paint smudges.
... And it wasn't so bad, was it? Enjoy rearranging and decorating your new and improved room now!
See Also:
Decorative Paint Striping Ideas
How to Paint Stripe Combinations
How to Paint Stripes Without Taping



Leave a Comment: